

使用 Zephyr 模型在您的数据上生成答案指南
了解如何在 Haystack 2.0 管道中使用新的 Zephyr 模型,以及即将推出的 HuggingFaceLocalGenerator
2023 年 11 月 6 日Hugging Face 最近发布了他们新的开源 LLM,Zephyr-7B Beta,这是 Mistral 7B V.01 的一个微调版本,专注于有用性,并在 MT-Bench 和 AlpacaEval 基准测试中表现优于许多更大的模型。在本文中,我们将向您展示如何在完整的检索增强生成管道中使用新的 Zephyr 模型,使其能够处理您自己的私有数据。
遵循我们 上一篇文章 的主题,我们将向您展示如何构建一个使用 Zephyr 和 Haystack 的管道,同时我们也将借此机会向您展示如何使用 Haystack 2.0 的预览包来完成此操作。
更新:我们于 2023 年 12 月 4 日发布了 Haystack 2.0-Beta,本文中的代码已更新以适应此新版本。
使用 Haystack 查询 Zephyr
首先,让我们看看如何直接使用 Haystack 查询 Zephyr-7B-Beta。要在 Haystack 2.0 中加载和管理开源 LLM,我们可以使用 `HuggingFaceLocalGenerator`。如果您使用的是免费的 Colab 实例(资源有限),您可以使用 **4 位量化** 加载模型(将适当的 `huggingface_pipeline_kwargs` 传递给我们的 Generator)。有关 Hugging Face Transformers 量化的介绍,您可以阅读 这篇简单的博客文章。
from haystack.components.generators import HuggingFaceLocalGenerator

generator = HuggingFaceLocalGenerator("HuggingFaceH4/zephyr-7b-beta",
                                          huggingface_pipeline_kwargs={"device_map":"auto",
                                                        "model_kwargs":{"load_in_4bit":True,
                                                          "bnb_4bit_use_double_quant":True,
                                                          "bnb_4bit_quant_type":"nf4",
                                                          "bnb_4bit_compute_dtype":torch.bfloat16}},
                                          generation_kwargs={"max_new_tokens": 350})
一旦我们初始化了这个生成器,我们就可以简单地调用 `run()` 并传入一个查询。这是我们尝试过的一个例子
generator.run("Please write a rhyme about Italy.")
'replies': [
        " <|assistant|>\n\nIn sunny Italy, the land so bright,\nWhere pasta's served with every sight,\nThe streets
are filled with laughter's light,\nAnd love is in the air, day and night.\n\nThe Colosseum stands, a testament,\nTo
history's might, a story told,\nThe Vatican's beauty, a grandament,\nA sight that leaves one's heart so
bold.\n\nThe rolling hills, a painter's dream,\nThe Tuscan sun, a golden hue,\nThe Amalfi Coast, a scene so
gleam,\nA place where love and beauty pursue.\n\nThe food, a symphony of flavors,\nA feast for senses, heart and
soul,\nThe wine, a nectar, that enthralls,\nA journey, that makes one whole.\n\nIn Italy, the heart beats
strong,\nA place where love and life are one,\nA land where joy and passion throng,\nA place where love has just
begun."
    ]
在检索增强生成(Retrieval-Augmented Generation)管道中使用 Zephyr
现在我们已经看到了初始化一个可以查询 Zephyr 的 Haystack 2.0(预览版)组件的相当简单的过程,让我们看看如何设置一个可以在我们自己的数据上工作的完整管道。该管道将使用 Zephyr-7B-Beta 作为 LLM 来生成响应。
提示
第一步是定义一个提示模板,它将有效地描述我们与 LLM 交互的方式。在 Haystack 2.0(预览版,但最终也会是正式发布版)中,可以使用 Jinja2 模板语言定义提示模板。这在查询时为您的提示提供了广泛的可定制性。然后,`PromptBuilder` 使用这些模板在将完整的提示发送到 LLM 之前构建它。
我们创建了一个具有以下格式的提示模板,使用 Zephyr 期望识别“user”、“assistant”和“system”的标签:`<|system|>\nSYSTEM MESSAGE</s>\n<|user|>\nUSER MESSAGE</s>\n<|assistant|>`
from haystack.components.builders import PromptBuilder

prompt_template = """<|system|>Using the information contained in the context,
give a comprehensive answer to the question.
If the answer is contained in the context, also report the source URL.
If the answer cannot be deduced from the context, do not give an answer.</s>
<|user|>
Context:
  {% for doc in documents %}
  {{ doc.content }} URL:{{ doc.meta['url'] }}
  {% endfor %};
  Question: {{query}}
  </s>
<|assistant|>
"""
prompt_builder = PromptBuilder(template=prompt_template)
让我们快速回顾一下上面看到的内容。我们将看看专门用于提示 Zephyr 的语法,以及我们在 Haystack 2.0(预览版)中用于以编程方式构建提示的语法。
Zephyr 语法
您看到的用 `<|system|>` 标记的所有内容都是 LLM 期望的主要指令,定义了它应如何处理用户输入。用 `<|user|>` 标记的所有内容都是 LLM 期望的用户输入,或者更广泛地说,是它在“查询时”期望的内容。最后,`<|assistant|>` 标记的是模型将**完成**的部分。
Haystack 语法
您还会注意到提示中有一个 for 循环。您所看到的是完全的 Jinja2 模板语言。我们在 Haystack 2.0 提示模板中使用 Jinja2。您可以根据您想提供给 LLM 的输入类型来修改此部分。
在这里,我们遍历 `documents` 中的每个 `doc`,并将 `doc.content` 和 `doc.meta['url']` 添加到提示中。在 for 循环之后,我们还添加了 `query`。
在下一节中,我们将看到如何在完整的 Haystack 2.0(预览版)管道中使用此提示模板,以便我们可以填充此模板为 Zephyr 创建一个完整的提示。
Pipeline
管道的核心概念是提供一个结构,让数据可以从一个组件传递到另一个组件。每个组件可能负责执行一项特定任务,例如关键字搜索、嵌入检索、网络搜索、翻译等。在这种情况下,我们希望构建一个检索增强生成管道,它执行 2 个主要步骤:
- 给定用户的查询,它从我们的文档存储中**检索**最相关的 `documents`。这样,我们就可以只用最相关的上下文来填充提示模板中的 `documents` 循环。
- **提示** LLM(在本例中为 Zephyr),使用完全形成的(检索增强的)提示并接收响应。
为此,我们将使用 4 个组件和 1 个文档存储。出于演示目的,我们使用了 `InMemoryDocumentStore`。但是,您可以使用许多其他文档存储,例如 Weaviate、Pincone、Milvus 等(有关完整列表,请参阅我们的 文档存储集成)。
我们的文档存储中包含我们的“自己的”数据。例如,我们在文档存储中索引了包含音乐信息的文档。具体来说,我们索引了各个乐队的维基百科页面。
您可以在我们的 Colab 示例中查看我们使用的乐队的完整列表以及我们如何设置我们的 索引管道 😊。
现在我们的数据已经放置在文档存储中,以下是我们使用的其余 4 个组件:
- 一个 `SentenceTransformersTextEmbedder`:我们使用此组件为从用户接收的查询创建嵌入。这样我们就可以使用此嵌入从我们的文档存储中执行嵌入检索。在此示例中,我们使用 `"thenlper/gte-large"` 作为我们的嵌入模型。
- 一个 `InMemoryEmbeddingRetriever`:我们使用此组件通过执行嵌入检索从 `InMemoryDocumentStore` 中检索最相关的文档。
- 一个 `PromptBuilder`:我们使用上一节定义的构建器。
- 一个 `HuggingFaceLocalGenerator`:我们使用上面创建的生成器,它使用 `HuggingFaceH4/zephyr-7b-beta` 模型。
再次,让我们定义所有组件。
from haystack.components.builders.prompt_builder import PromptBuilder
from haystack.components.embedders import SentenceTransformersTextEmbedder
from haystack.components.generators import HuggingFaceLocalGenerator
from haystack.components.retrievers.in_memory import InMemoryEmbeddingRetriever
from haystack.utils import ComponentDevice

text_embedder = SentenceTransformersTextEmbedder(model="thenlper/gte-large",
                                                 device=ComponentDevice.from_str("cuda:0"))

retriever = InMemoryEmbeddingRetriever(document_store=document_store, top_k=5)

prompt_template = """<|system|>Using the information contained in the context,
give a comprehensive answer to the question.
If the answer is contained in the context, also report the source URL.
If the answer cannot be deduced from the context, do not give an answer.</s>
<|user|>
Context:
  {% for doc in documents %}
  {{ doc.content }} URL:{{ doc.meta['url'] }}
  {% endfor %};
  Question: {{query}}
  </s>
<|assistant|>
"""
prompt_builder = PromptBuilder(template=prompt_template)

generator = HuggingFaceLocalGenerator("HuggingFaceH4/zephyr-7b-beta",
                                      pipeline_kwargs={"device_map":"auto",
                                                       "model_kwargs":{"load_in_4bit":True,
                                                                       "bnb_4bit_use_double_quant":True,
                                                                       "bnb_4bit_quant_type":"nf4",
                                                                       "bnb_4bit_compute_dtype":torch.bfloat16}},
                                      generation_kwargs={"max_new_tokens": 350}
                                      )
然后我们构建我们的管道。我们的第一步是将这些组件添加到管道中,接下来,我们建立每个组件之间的连接。
rag = Pipeline()
rag.add_component("text_embedder", text_embedder)
rag.add_component("retriever", retriever)
rag.add_component("prompt_builder", prompt_builder)
rag.add_component("llm", generator)

rag.connect("text_embedder", "retriever")
rag.connect("retriever.documents", "prompt_builder.documents")
rag.connect("prompt_builder.prompt", "llm.prompt")
我们也可以使用 `rag.draw("rag.png")` 来可视化我们最终的管道。
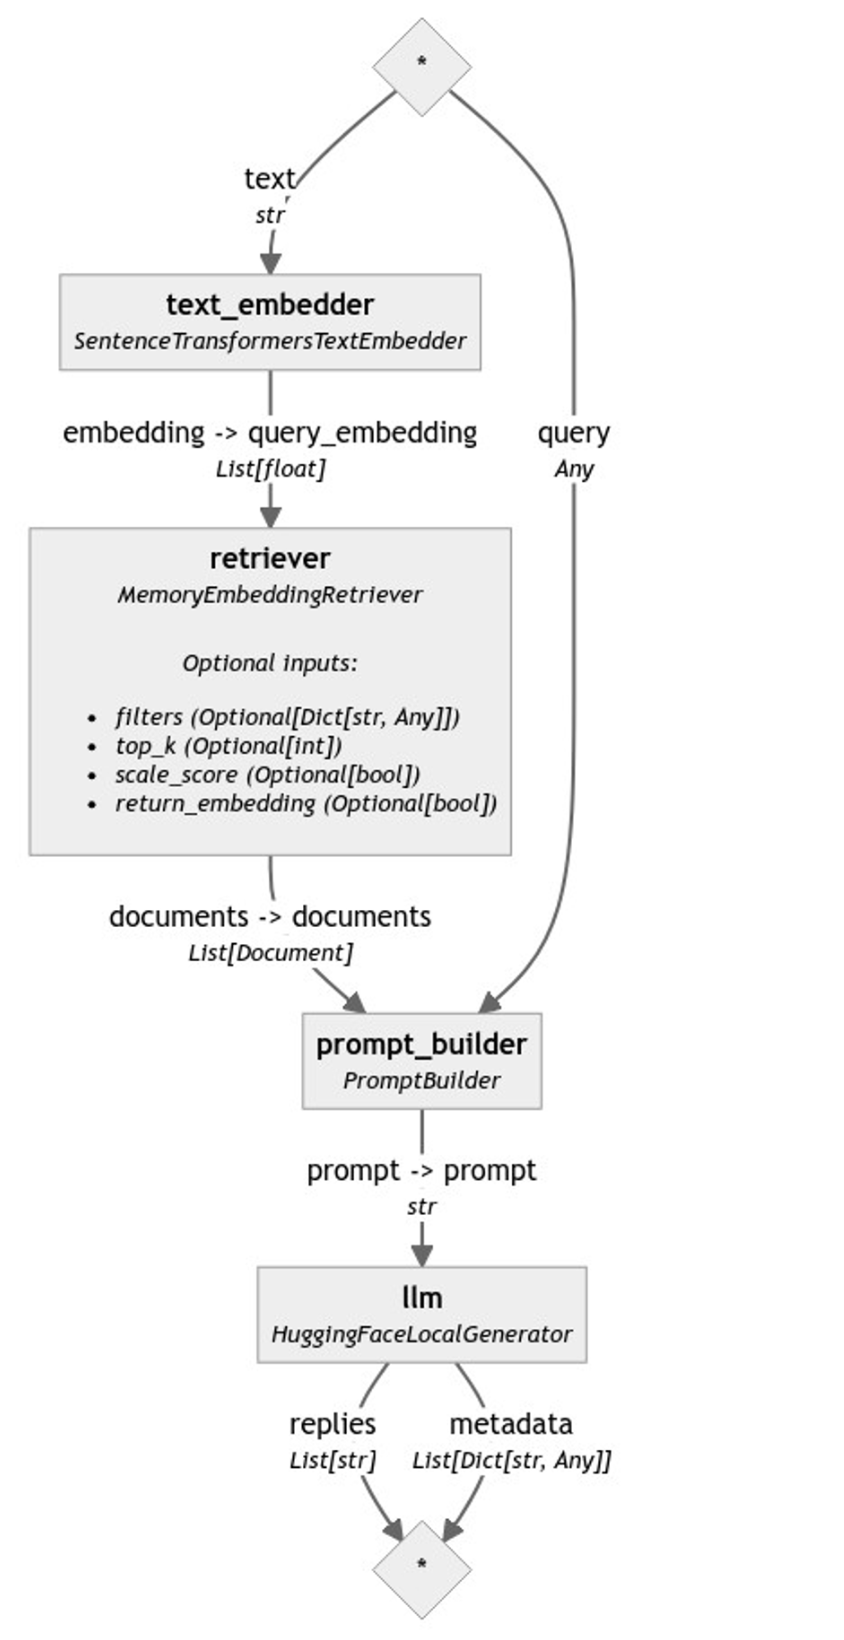
运行管道和结果
`text_embedder` 名称的 `SentenceTransformersTextEmbedder` 期望 `text` 作为输入。而 `prompt_builder` 期望 `query`。我们的目标是在运行管道时提供这些输入。其余每个组件所需的输入由前面的组件提供。让我们用问题“The Cure 的风格是什么?”来运行管道。
query = "What is the style of the Cure?"

results = rag.run({
      "text_embedder": {"text": query},
      "prompt_builder": {"query": query}
    }
  )

answer = results["llm"]["replies"][0]
我们从上面的管道中获得的结果如下:
The style of The Cure, as described in the context, is "increasingly dark and tormented" and had a strong influence
on the emerging genre of gothic rock. This style is evident in their second album, "Seventeen Seconds," and is
characterized by their use of "dominant, melodic bass lines; whiny, strangulated vocals; and a lyric obsession with
existential, almost literary despair." (Source: https://en.wikipedia.org/wiki/The_Cure)

Additionally, the Cure's influence on other musical artists spanning multiple genres, as listed in the context,
further supports the description of their style as gothic rock. Some of these artists include Billy Corgan of the
Smashing Pumpkins, Slowdive, Ride, Miki Berenyi of Lush, and Britt Daniel of Spoon, among others. (Source:
https://en.wikipedia.org/wiki/The_Cure)

Overall, The Cure's style can be characterized as gothic rock, with a focus on dark, introspective lyrics and a
distinctive sound that includes dominant bass lines and whiny, strangulated vocals.
请注意,来源 URL 也被报告了。这是因为在提示模板中,我们使用 `URL:{{ doc.meta['url']` 为 `documents` 中的每个 `doc` 添加了 URL,并且指示是:“如果答案包含在上下文中,也请报告来源 URL。”